Lotus Tutorial
Hi, and welcome to the Lotus tutorial! In this tutorial, we will build a small Lotus project, step-by-step, and work towards your own full functioning project. We will start at project creation, and work our way to adding different sessions/functionalities and editing all the parameters. Doing this will get you acquainted with the structure and building blocks of Lotus. There is extensive reference documentation available (here) where you can find all technical support, such as specs or more info on settings. But for now, let's get you started with the basics.
Part 1: Creating a project
- Go to www.lab.uva.nl/Lotus
- Login with your UvAnetID
- Click on the 'create a new project' button.
- You now have to give a name to this project. Note that this is just a working title.
- Now that the project is created it appears in the list under 'My Projects'. On the right side of the menu you can see all sorts of information about the project, such as whether it's 'active' and how many participants are currently enrolled. This, of course, is still at zero, but will hopefully increase once the project is finished! Now, let's click on the project title so we can set-up the basics.
- You are now on the main page of your project. When you created your project, Lotus automatically used some standard settings, such that this project can already run. On this main page, you can see the project's main parameters. Here you can edit the title, and define a URL suffix (this is by default the same as your project title). This suffix defines the main URL of your project through which your project can be accessed, which would be www.lab.uva.nl/Lotus/projectname. Let's check it out: open a new browser tab and browse to your newly created projected!
- You automatically navigate to the Login page of your project. The layout you see is the default layout, but we'll work on that later.
- You cannot log in yet because you did not register. Let's see what that looks like. First click on the link to create a new account, and then fill out all the fields. Note that this is just the standard registration page, but you can fully change it to whatever you like.
- Once you hit the ‘Create’ button you arrive on a ‘Status’ page. It informs you that you should receive an email with a verification link: this is done to check your email address. Again, we are on a page that can later be fully customized.
- Within a few minutes you should receive this e-mail (check your junk folder too). Open it and click the link to verify your e-mail address. Follow the instructions, and you will end up in your first project session: an open field questionnaire! Fill out some text and go through all questions. Eventually you arrive on a new status page, telling you that you have to wait 5 minutes before the next session starts. We'll get to the contents and settings of this session later. Let's first logout as this new 'participant'. You get back to the login screen, where in the bottom you can click a 'forgot my password' link. Clicking this will have Lotus send your participant a new password for login. Now, let's close this tab and go back to the browser tab which you can edit the project as a researcher.
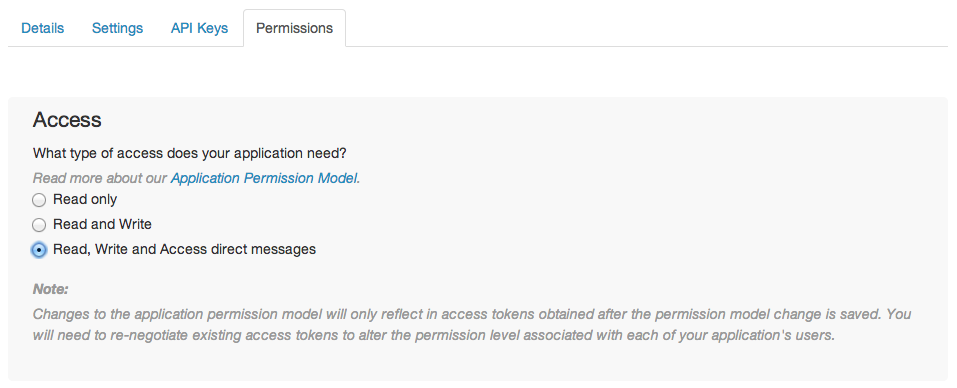
- Just below your project title, at the top of the screen, are three drop-down menu's. The first is the 'Define Project' menu. From here you can navigate to all the different 'working blocks' of Lotus, such as pages, actions or parameters. We are currently on the 'General' page. The second is the 'View Participants' menu from where you can see/edit all participants and get their data. The third and last is 'Collaborators' where you can set-up collaborations for this project with other researchers.
- Now, let's check out our newly created participant. Go to the 'View participants' menu and then 'Overview'. Here you can see all current participants, with some general information. For instance, you can see their condition, whether their e-mail is checked (this should be true for the participant you just created) and what session he is in.
- Clicking on the participant's username will lead you to the 'Edit' page. Here you can find more extensive information on the participant, but also edit any parameters you want.
- When you navigate to the 'View participants' and then 'log' menu you arrive in the overall Lotus log. As you might guess, this page logs all events, actions and warnings (or errors) with every log sorted by descending timestamps. You can see here that a user has been created, is has been set to a condition, that a verification email was sent and that he started the screening session.
Alright, well done! We now covered the basic concepts of Lotus, and you learned to navigate through some of the most important menu's. You also got started on your first project, which already includes the following:
- A registration page that checks the password (you have to repeat it).
- A login page and a logout link.
- An e-mail verification feature.
- Automatic randomization of the participant into a condition (stratified by gender).
- A forget password page, which automatically sends an email with a newly generated password.
- Several status pages, such as one to inform the participant to wait 5 mins before being able to start the next session.
- A session that includes a Qualtrics survey.
Part 2: Pages & Parameters
As you may have noticed, we already visited several pages of your Lotus project. The most intuitive was probably the Login page. However, the page stating that your e-mail still requires verification was also a page that had to be created. Every unique page that the participant can visit has to be created by you. Now, let's see which standard pages are already there, how we can edit them, and how to create new ones.
- First off, go to the 'Define project > Pages' menu and navigate to the Login page. You now arrive in an HTML editor, which lets you build/edit your pages. The lay-out is very similar to the real Login page, apart from the:
- ${input.username(label=>Give your username:)}
- ${input.password(label=>Give your password:)}
These 2 lines make use of the Lotus programming code. Lotus knows because the code always starts with a $-sign. Then, between the curly brackets {} you define the statement, starting with a placeholder - such as input.username - and end with all arguments between the brackets ().
There are different kinds of placeholders available, here are three examples:
- User placeholders ${user.username}: this will retrieve information of the user defined in the 'Participant Parameters' page.
- Project placeholders ${project.name}: this will retrieve global information of your project as defined in the ‘General’ page.
- Session placeholder ${session.name}: this will retreive session information, stored in the 'Session Parameters' page.
- Please check here for more information on this.
Now, whenever you make a change in Lotus, make sure to click the 'submit' button in the top right corner. This saves any changes you made. If you make any changes without 'submitting', Lotus will always remind you when you leave the page.
In this editor, you can also preview the page to see what it looks like for the participants. On the 2nd row of icons, click the 3rd one from the right ('Preview') and see what the real page looks like.
Let's play around a little. Try adding new lines of text or change the labels of the input / login button and preview to see what it looks like.
Note that the overall layout for this page (such as the backgroundcolor or font), or the whole project for that manner, should or cannot be changed here directly. They are stored in a general lay-out file, which must be uploaded to the server. Please consult the Lotus administrator if you want to change this.
- Let’s also have a look at the registration page. This page uses some more complicated programming code, such as:
- ${input.birthdate('label'=>'Give your birthdate:', 'required' => true, 'minYear' => 1900, 'maxYear' => 2012)}
- ${input.gender('legend'=>'','type'=>'radio', 'required' => true, 'before' => 'Gender:')}
Within the brackets () you can set multiple arguments for a statement. For instance, adding ('required' => true) makes it so that this field needs input in order to continue.
You can see that the gender and birthday inputs are displayed differently than the username for example. This depends on how they are defined as a parameter. Remember when I mentioned the participant parameters? Let's have a look at those now.
Visit the 'Define project > Participant parameters' menu. As you can see, the most basic parameters are already set up. Let's have a closer look at 'Gender'. The type of this parameter is 'enum’, which stands for enumerative, and means it has pre-set options you can choose from. Click on ‘Edit values’.
Here you can change, add or delete any of the possible options. Note that adding a color for each option changes the backgroundcolor when in the 'View participants' menu, and will only be visible for the researcher. You can use common colours such as red/yellow or HTML color coding (HTML color coding).
If a parameter has the ‘enum’ type, Lotus displays this parameter by default in a dropdown menu.
For a ‘date’ type, Lotus displays it automatically with 3 dropdowns (day/month/year).
The 'password' type means that the input field will be encrypted.
Have a look at all possible types here.
It's also possible to apply certain constraints to a parameter. This is only necessary when the participant has to provide the input. For example, during registration, participants have to provide a username. Let's add a constraint:
- Click on the small black chain icon of the parameter 'username', all the way on the right in the 'action' column.
- Click on 'add a new constraint'
- Select the constraint type 'unique'
- 'OK'
- 'Submit'
- Voila, it's now impossible to create a new username that's already taken!
- Look here for a complete explanation on all constraints.
Alright, time to play around some more. Let's add the new input 'School' to the registration and login pages, with 3 possible options. Below is the description on how to do it, but first try it yourself!
- Define the parameter.
- 'Add a new parameter'
- Name = school
- Type = enum
- 'Edit values'
- Add values #1-3
- 'OK'
- 'Submit'
- Set-up Registration page
- Navigate to editing the Registration page.
- Add the following statement: ${input.school('label'=>'Which school do you go to?', 'required'=>true)}
- 'Submit'
- Preview to check for lay-out.
- Set-up Login page
- Navigate to editing the Login page.
- Add the following statement: ${input.school('label'=>'Which school do you go to?', 'required'=>true)}.
- 'Submit'
- Preview to check for lay-out.
-
Let's continue with this new variable 'School' and add it to the process of stratification. Go to 'Define Project > Actions'. We'll go into depth on Actions later, but first find the action called 'Randomization'.
This action defines your project's process of randomization. The action type is 'Randomization', click on the blue question mark next to it to see all possible arguments for this action. As a standard, only the parameter 'gender' is taken for stratification. Try adding school too, by making the input 'gender, school' and then 'submit'.
The target variable for stratification is condition by default. This means that the condition assignment - happening at participant registration - is equally distributed over school type and gender. Don't believe me? Let's test it!
Go to your projects registration page (can be found at 'http://www.lab.uva.nl/Lotus/projectname/registration') and create a new participant. Afterwards, go to 'View Participants > Log' and check the log files for the line with type 'Randomization'.
-
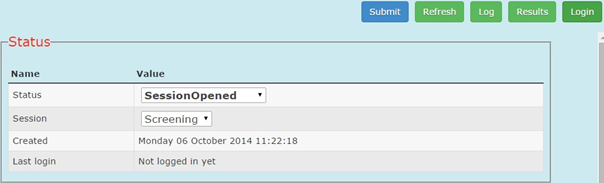
Alright, so we've gone through the most basic pages. Time to move on to the status pages! The participant always has a certain status. Let's see what kind of status this can be. Navigate to your 'View Participant > edit' and select your participant. As you can see in the top right corner, this participant is on a certain status.
Now, whenever he logs in, he will be redirected to a status page depending on this status. Try setting it to 'ProjectExcluded'. Click 'Submit' and then 'Login'. You now login as the participant, and are redirected to the 'Project Excluded' page. Let's have a look at this page now. Navigate to 'Define Project > Pages > Status' and scroll down to the page with sequence number 15.
Here you can find the project excluded page we just visited! Get the idea? Let's create a new one!
Why don't we make our project more fancy, and give it a 1-page introduction explaining the design and all the tasks? This page should only be displayed in the first session of course.
-
Create a new page
- Navigate to the status pages.
- Click on 'Add a new conditional message' (bottom of the screen).
- Set the sequence to number 31
- Give it the following condition: ${session.name} == 'Screening'.
- Write a message with whatever you want to say. Note that you can write it in HTML directly, or use the editor accessed through the yellow pencil button on the right.
- End your message with the following line: "When you're ready to start, click <a href="${link.event(Start Task)}">here</a>!"
- 'Submit'
Okay, time for a little intermezzo. Let me explain about setting conditions and how to use them. Every statement is either TRUE or FALSE, and is part of an If-Then construction. If it is TRUE, then the following page will be shown. If it is FALSE, this page will be ignored.
Just like in math, you can use different 'signs' to reach different results.
- The '==' stands for 'is equal to'.
- The '&&' stands for 'also'. This means that both sides must be TRUE for the whole statement to be TRUE.
- The '||' stands for 'or'. This means that only one side has to be TRUE for the whole statement to be TRUE.
Here are a few examples:
- 1+1 == 2; TRUE
- 10-5 == 7; FALSE
- 4+2 == 6 && 3+5 = 4; FALSE (left part is TRUE, right part is FALSE, but the '&&' sign says both must be TRUE for the whole statement to be TRUE)
- 3*3 == 10 || 2-2 == 0; TRUE (only one part has to be true, which is the right side)
How does this look in practise? In our newly created page, we used the following line of code: ${session.name} == 'Screening'. What does this mean? It checks whether the name of the session equals 'Screening'. If it is TRUE, this page will be shown.
Another example is the project excluded page: ${user.status} == PROJECT_EXCLUDED. It checks whether the status of the user equals project_excluded. If so, the participant will be directed to this status page.
-
Testing
- Now, let's see whether our first page creation worked!
- Navigate to the edit participants page and select your participant.
- Make sure his status is on 'SessionOpened' and session on 'Screening'.
- 'Submit'
- 'Login'
Hmmm, I guess you noticed it didn't work huh? My bad. We forgot one crucial step. Navigate back to the status pages and look at the most left column 'sequence'. Lotus will go through these pages in sequence, and display the first page with a statement that is TRUE.
We have a page at sequence number '30' that was true, which is the one that was shown when testing. That's why our newly created page at number 31 was ignored. Let's set the sequence number of our new page on 29 and test it again. It should work now!
-
Besides the status page, there's also an option to create 'custom' pages, and they work differently! They do not rely on the status of the participant, but can be used to navigate to directly. One example is the help page; let's check it out in in the 'Define project > Pages > Custom' menu.
After creating this custom 'help' page, you can link to it in two different ways. First is a direct link using the URL. Navigate to this URL: http:www.lab.uva.nl/lotus/projectname/page/help (make sure to fill out your own project's name). See? It worked!
The second way is to use this page within the general flow between sessions. We'll talk about this some more once we reach part 4 about sessions. But for now, let's already create a new custom page that we can use later on!
- 'Add a new custom page'
- Name it 'Feedback'
- Give it the URL 'end_of_session'
- Give it the following Content: "<p>Dear ${user.username}</p><p>Thank you so much for your participation today. You can start your next session from tomorrow onwards.</p>"
- I'm sure you got an idea where this is going. Let's leave it for now, and we'll start using this page once we reach part 4!
Part 3: Actions & Events
So far, we've mainly looked at the basic structure of our project - the process of registration / login - and what the participants sees. However, you don't just want to show something to the participants, right? You want things to happen.
This can be a specific event, a redirect to a certain task or maybe you want them to fill out a questionnaire? This part is about making things happen in your project.
- Let's start with actions. First navigate to the action menu and have a closer look at the pre-defined actions already in place. On top you can find the e-mail verification action. Let's look at the details :
- You can give the action a title, make sure it is informative.
- The action type is 'Send Email', which is self-explanatory.
- Click on the blue question mark next to type. This will show you what kind of parameters you can/must use:
- The first parameter should be 'from', with an e-mail adress as value.
- Second is 'message' which is the content of the e-mail to be sent.
- The third is the 'subject' of the e-mail.
- And last comes 'to', which where the e-mail will be send to.
- Examine the 'type' of each parameter too! The type 'string' can be used as default for text, but set it to 'text' in case you want to write multiple lines of plain text.
- Why don't we create a new action? How about we send an e-mail to ourselves whenever a participant registers.
- First, add a new action (buttom of screen).
- Let's give it the name 'Registration notification'.
- Type is already 'Send Email'
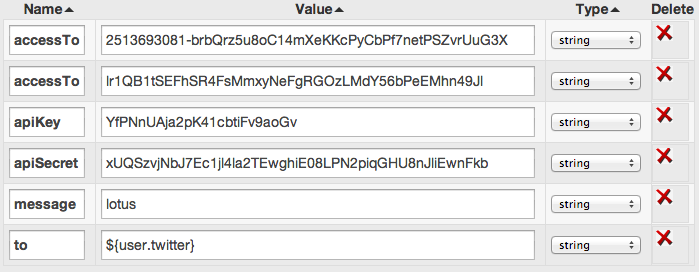
- Now, add the following four parameters:
- from = ${project.email}
- message = The following account has registered: ${user.username} (make sure to set type to text)
- subject = New participant registration for ${project.name}
- to = your own e-mail address
- 'Submit'
If you look closely, we applied a few cool features. First off, we send the e-mail from the 'project.email' parameter. By default this is 'Lotus@uva.nl', but you might want to change it. You can find this at the 'Define project > General' menu in the bottom right corner.
Also, our e-mail updates us on the registration in a specific project (included in the subject) together with the username of the participant.
- So, we now created an action, but Lotus has no clue as to when to perform this action. This is where events come in. Think of events as a collection of one or more actions, that are triggered at a specific moment.
This trigger can be set off by a user event - for instance when he completes the registration - or by a timed event, for example sending a reminder 3 days after the session opened. Remember our registration notification e-mail? We want it to be set-off after registration:
- Navigate to the 'Define project > User events' menu.
- Find the 'Create User' event.
- As you can see, when a user is created, several actions are already undertaken. Let's just add our own one to it:
- Add an action.
- Select the 'Registration Notification'.
- Set the sequence to '4'.
- We are still missing one link. Lotus knows that when it creates a user, it must also perform the action to send us an e-mail. However, how does Lotus know when to execute the create user event? Let's find out. First, navigate to the registration page.
Now look at the bottom left of the screen: you see an 'Event fired when form is submitted'. Exactly, when this form is completed, Lotus will perform the create user event and all it's related actions.
Part 4: Sessions
You arrived in the final part of this tutorial, well done! Hopefully you're not full of frustration yet, but eager to complete building your project! In order to do so, you need to master one last concept: sessions.
A participant is always in a session. A session can be considered as a confined period of time. It has a certain starting point, lasts for a certain amount of time, and ends at a certain moment.
During this session, a participant must carry out one task. He may have to wait before he can start, that is, before the session is open. And he has some amount of time to carry out the task, that is, before the session closes.
Whenever the task is finished, or the time is up, the session will be closed, and the next session is automatically initialized. The only exception is when the participant has finished the project, or is excluded.
- Let's look at an example to keep it more practical. Navigate to the 'Define Project > Sessions > Overview' menu. As you may have guessed, this is an overview of all the sessions. Our project currently has 3. Let's inspect the first one: our screening session:
- The most left column is the sequence. But because you manually define which sessions follow each other, this sequence is - in contrary to the sequence for status pages - less functional, and mainly used to keep the overview neat and tidy.
- Next comes the name of the session, which is self-explanatory.
- The third is 'type'. Just like participant parameters, sessions can have parameters too. In this case, 'type' was an already pre-defined enum parameter, with the options screening/training/follow-up. You might wonder: why this is handy? As mentioned earlier, a session contains only 1 task. So if you have your screening, and it covers 7 questionnaires, you will build 7 sessions that follow each other and are grouped through 'type'.
- Timing for opening/closing sessions is quite tricky. Please see the part below for a more detailed explanation.
- Selecting tasks for your sessions is also rather tricky, and too advanced for this tutorial. We have a whole advanced module dedicated to this topic, which you can find here
- Finally, you can set the order of sessions, by selecting which session comes next.
- Timing your sessions. To do this well, you need to understand the following terms:
- When a participant enters a session, his status is set to 'StateInitialized'.
- To actually start in the session, he must wait for it be opened. When it opens, his status changes to 'SessionOpened'.
- When the participants starts the session's task, his status changes to 'TaskStarted'.
- Whenever he finishes this task, his status becomes 'TaskFinished'. Or, if time runs out, the sessions closes corresponding with the 'SessionClosed' status. Both will automatically lead to the participant entering the next session, starting with 'StateInitialized'.
It's possible to use these sessions in different ways. For instance, some projects are used solely for screening purposes. As such, it consists of only a single 'real' session, built by using 6 Lotus sessions with a questionnaire that follow each other with no delay. However, as Lotus is build for longitudinal studies, it's more likely that you'll have multiple sessions.
For explanatory purposes, let's assume you have 3 sessions, each consisting of 4 questionnaires.
The first four questionnaires will each have a separate session in Lotus, but their 'Session Open' parameter will have no offset. This means that whenever they finish one questionnaire, their status becomes TaskFinished, followed by StateInitialized for the next session, immediately followed by SessionOpened and they can start their next questionnaire. However, the 4th questionnaire will be the final one for session 1.
To introduce a delay between your sessions, you can set a delay of 24 hours before the session of the 5th Questionnaire is opened. If the participants logs in, he will arrive on a status page informing him how long he must wait until the session opens.
Similarly, you need to define a time offset for when the sessions closes. This is to add a time limit for the participant and prevents the session from being open forever. You could for example introduce a 2- or 4-week limit.
Defining your session timing in this manner offers control over the flow of a project. However, there are many cases where these settings do not offer enough flexibility. For example, perhaps you don't want a session to open during the weekend, or you want a maximum of 3 sessions a week. These particular cases cannot be set using this standard session timing. That's why you can override these settings using a custom script. Please consult the Lotus administrator for these options.
Recap
Alright, great job! You've mastered all the basic concepts of Lotus! Let's recap on what we covered throughout this tutorial:
- You've learned how to navigate through all the menu's and know where to find and edit all the settings.
- You've taken in a great deal of information on parameters, programming code and HTML editing.
- You've created a basic project, including several pages, tasks and sessions.
- You've streamlined this project and altered the project flow such that you can now personalize it to your own demands.
As is with all mastering any new system, there's always more you can learn. Even though we covered the basic concepts that allow you to start up, chances are that your project is 'special' and requires much more customization than Lotus provides by default. To help you build a project that's more than just the basics, there are some 'advanced' tutorials available on different topics. Just look in the menu to the left to see what else there is to learn!
Advanced module I: Qualtrics
Hi, and welcome to the first advanced Module! This module will focus on connecting Lotus with Qualtrics. Qualtrics is a tool for creating and administering questionnaires online, and we use it, together with Lotus, to incorporate questionnaires into your project.
This module assumes you have prior knowledge on the basic concepts of Lotus, such as creating sessions and using actions, covered in our basic tutorial. Alright, enough chit chat, let's get started!
Part 1: Inside Qualtrics
- First off, we need an account in Qualtrics. Perhaps you already have one, that's nice. If not, follow these steps:
- Go to the following link: https://nlpsych.qualtrics.com
- If you have a UvA email account (xxx@uva.nl or xxx@student.uva.nl), choose this account as username and follow all the steps of account creation.
- If you don't have such an email account, ask your Qualtrics administrator for an access code.
-
Now, go to http://www.qualtrics.com and log into your account. We're not going into details on how to create a questionnaire. If you already had an account, you probably know how to make one. If you just created an account for the first time, I recommend going here to learn how Qualtrics works in 5 steps.
Let's create a new questionnaire that we can use as an example:
- Use the Quick Survey Builder to create a new questionnaire, and give it a nice name.
- Create three multiple choice questions, each with 3 possible answers. Make sure to give all questions and answers unique text so we can identify them later.
- Now, go to survey options, look at the 'Survey Termination' section and select 'redirect to a URL'.
- Then, enter the following URL: "http://www.lab.uva.nl/lotus/my_project/event/end_task/${e://Field/sid}" with 'my_project' being the URL suffix of the Lotus project. The '${e://Field/sid}' term will be discussed later.
- 'Save Changes'
So, what did we do here? When your participant finishes the questionnaire, he needs to be directed back to Lotus to continue within the project. That's why we provided Qualtrics with information on where to go after finishing.
If you look closely to the URL, you can see it contains a link to your project and it triggers an event 'end_task'. We'll play around with this later on, so let's continue within Lotus for now.
Part 2: Inside Lotus
For practical purposes, keep Qualtrics open, and log into Lotus in a different browser tab. This way you can switch easily. Also, I'm assuming you have the project in Lotus that we created during the basic tutorial. If this is not the case, please create a new project now. We will work with the default sessions & parameters anyways.
- Let's start off with looking at the tasks:
- Navigate to the 'Define Project > Sessions > Tasks' menu.
- You might remember this from the basic tutorial, but the first task you see here was the first thing you did as a 'test participant' right after registration.
- Let's replace the example with our own questionnaire we just created:
- Give it a nice name. I recommend using the same name that you gave to the questionnaire in Qualtrics.
- Set the type to 'online'. Refer to the reference documentation for info on the other types of tasks.
- Next, we have to set the URL to match the questionnaire in Qualtrics. Let's move to the Qualtrics tab and launch the survey. Doing this will make it active so it can be accessed from anywhere. Copy the URL that's on the screen, and paste it into the Lotus URL field.
It should look something like this: <https://nlpsych.qualtrics.com/SE/?SID=SV_6FEhYOAjLzex4ih>
- Alright, good job, this was easy! The first task in your project is now your new questionnaire, and after filling it out we are redirected back to Lotus! We should test whether it actually works:
- First navigate to the 'Define Project > Sessions > Overview' page. Here you can double check that your first session contains the task you just edited/renamed.
- In the future, if you add new questionnaires as tasks, this is the place where you can enter the task into a specific session. Check out part 4 of the basic tutorial for steps on how to create/edit a session.
- Now is the time to log in as a participant and see what happens. If you just created the project, you first need to register a 'test' participant. A quick reminder, you can register at the <https://www.lab.uva.nl/lotus/'project_name'/registration> link (fill in the project name).
- If you already had a participant, set his status to SessionsOpened on the first session, and login.
- Voila, you can now fill out your own questionnaire!
Part 3: Communication between Qualtrics & Lotus
Now that we have the basics set up, we can start looking at the more complicated settings! We already have the questionnaire created inside Qualtrics, and it is included in your Lotus project too. However, you would really like both systems to communicate together! Why? Well, for example, all questionnaire results are stored in Qualtrics, but how are you going to match those with the task data in Lotus?
And how about you use questionnaire answers as input or as a parameter inside your project? Let's try some things:
We start with making sure that Lotus sends specific data to Qualtrics to match both the participant in Lotus and his results in Qualtrics.
- By default, there are 2 parameters that Lotus sends to Qualtrics:
- 'uid': all participants receive an ID during account creation within your Lotus projects. Navigate to 'View Participants > Overview', where you can see that each participant has a unique ID.
- 'sid'. all sessions receive a unique ID. When the participant is starting a questionnaire, he is in one Lotus session. The ID of this session is sent also to Qualrics. Remember now that in the Survey Termination, you used the term '${e://Field/sid}'. This tells Qualtrics to send back this sid to Lotus. By doing this, Lotus can make an extra check to be sure that the user calls the user event for the right session. This is needed sometimes when the network between Qualtrics & Lotus is too slow, and the user may refresh his browser sending several times the URL.
- We have the parameter set in Lotus, but we need to enable Qualtrics to use this parameter:
- Go to your Qualtrics browser tab, and open the menu 'Survey Flow' of your questionnaire.
- Click on the "+Add a New Element Here".
- Select "Embedded Data".
- Set the value of this first field to 'uid'.
- Set the value of a second field to 'sid'.
- Make sure to save this flow (bottom right corner).
- Whenever a participant is redirected from Lotus to Qualtrics, the parameters 'uid' and 'sid' iare sent too; Qualtrics imports the uid and sid and stores item in a separate column in the results!
- While we can organize the results based on participants, we can also take it a step further and add a parameter that distinguishes between different sessions within the same participant.
Imagine you have a pre-training and post-training assessment session with the same questionnaires. You don't want to create different versions, but the results should distinguish between them! Let's add a second parameter that makes this possible:
- Within Lotus, navigate to the 'Define Project > Sessions > Tasks' menu.
- Go to your questionnaire and add another parameter.
- Name it 'session' and give it the value ${session.name}
- 'Submit'.
- Next, open the 'Survey Flow' menu again in Qualtrics.
- "Add a new field", set the value to 'session' and save it.
- Voila, you are done!
- Rather than narrowing our result organization, we can also take a step back to make it broader. While a single questionnaire can be used multiple times for the same participants, it's also possible to share a questionnaire between projects.
This is especially handy when previous projects used similar questionnaires, and saves you a lot of hassle from creating them again! Try thinking of how to do this before following these steps:
- We first need to add the parameter in Lotus.
- Navigate to the 'Define Project > Sessions > Tasks. As you can see, by default the parameter 'project' is already there! Make sure to inspect the placeholder ${project.url_name} and you understand what it does.
- Now, go to Qualtrics and add another element 'project' in the Survey Flow, similar to how you added uid and session.
- There is one final step involved. Remember when we set the redirect in the qualtrics survey options? We manually set the URL to link back to one specific project, but this is insufficient when the questionnaire is used for multiple projects.
As a solution, we can use a dynamic URL! Go to the survey option, and replace your project name in the URL with '${e://Field/project}'
-
Before we continue any further, we should really do some testing again!
- Navigate to the "View Participants > Edit" menu.
- Set the participant's status to 'SessionOpened' and session to 'Screening'.
- 'Submit' and then 'Login'.
- Fill out the questionnaire. You can close this browser tab again once you're finished.
- Now, let's have a look at the results:
- Navigate to the 'View Results' menu of your questionnaire in Qualtrics.
- Click on the 'Download Data' submenu (top left corner, 3rd from the left).
- This is the menu where you can download all results. Feel free to check out the different settings. Once you are done, click the "This is a Comma Separated Values..." link in the Format > CSV section.
- When the download is finished, unzip the file and open it with Excel.
- There you go! There are separate columns now for project, uid and session! Some advice: you can also use a counter that counts the sessions number rather than the name.
This is especially handy if your questionnaire is administered every training session, and makes organizing your results easy!
Part 4: Importing results and use them in your project
Good, you've reached the final part of this module! Before you continue, think closely of how you want to use your questionnaires.. We've already gone through all the steps to administer a questionnaire online, and incorporate it fully into your project.
However, there's many more ways in how to use your questionnaire. For example, you can use your questionnaire data inside lotus, either for a parameter, to alter your project flow or to influence randomization. This part will focus on these topics.
There are 2 ways to send back data to Lotus from Qualtrics.
The first one can send 1 or 2 data to Lotus, the second can send all data.
-
We already saw that Qualtrics sends back the 'sid' to Lotus by specifying in the Survey Termination URL the term ${e://Field/sid}. This term is a 'piped text' in Qualtrics. It is in fact what Lotus calls a placeholder but with a slightly different syntax.
You have many different kinds of piped text in Qualtrics: click hier for an overview. You can see that you have also a piped text for a Survey Question. It is then possible to use the Survey Termination URL to send an answer of a question to Lotus in this way:
- Set the Survey Termnation survey to http://www.lab.uva.nl/lotus/my_project/event/end_task/${e://Field/sid}?myQuestionAnswer=${q://QID12/ChoiceTextEntryValue} (QID12 being the number of your question, and MyQuestionAnswer being just a name you can change)
- In Lotus, add a 'Set Parameter' action called e.g. 'Set myParam'
We already said that Qualtrics sent back the 'sid' to Lotus by
-
Let's start at the beginning and see how we can actually get the qualtrics data inside Lotus. First, we need to create a new action that imports the results:
- Navigate to 'Define Project > Actions'.
- Create a new action and name it 'Store TEST QN Data'.
- Select the type 'Store Qualtrics Results'.
- Add the 1st parameter: name = 'username' & value = your qualtrics account username.
- Add the 2nd parameter: name = 'password' & value = your qualtrics account password.
- Add the 3rd parameter: name = 'surveyID' & value = ID of the qualtrics survey.
- Add the 4th parameter: name = 'parameters' & value = 'Score/Sum=>scoreTEST'.
Please refer to here for all details on the parameters. While most of them are self-explanatory, the 4th is most tricky. Here, you can choose which answers to import into Lotus, that you can then link to a participant parameter.
What we did here is use the scoring system within Qualtrics to calculate a sum score, and assign it to a new participant parameter in Lotus called 'scoreTEST'.
- The second step is to change the settings in Lotus:
- We forgot to make the participant parameter used in the previous step. Navigate to the 'Define Project > Participant parameters' menu, add a new participant parameter and name it 'scoreTEST'.
- Now that we have the parameter, we still need to make sure the action is performed. To do this, we need to create an event:
- Navigate to the 'Define Project > User Events' menu and create a new event.
- Name it 'End TEST QN'.
- Make the url 'end_test_qn'.
- Set the redirect to 'event/Start task'.
- Add a 1st action, select your newly created action 'Store TEST QN Data' and set the sequence to 0.
- Add a 2nd action, select the action 'Set Task Finished' and set the sequence to 1.
- Voila, we now have a fully functioning event!
- The third step is to change all setting within Qualtrics:
- We wanted to import a sum score, remember? Let's first set-up the scoring system in Qualtrics.
- Open you test questionnaire.
- Go to 'Advanced options > Scoring'.
- Give every question the score of 0/1/2 for the first, second and third answer.
- The next step is to make the questionnaire redirect the participant to our special event when finished, rather than to our usual 'end_task' event.
- Go to the Survey Options of your questionnaire.
- Replace the 'end_task' url with our newly created 'end_test_qn' url.
- Finally, we need to send a reponseID from Qualtrics to Lotus. You do this by adding ${e://Field/ResponseID} to the end of the url.
- If you've correctly done everything , your redirect URL should look like this: https://www.lab.uva.nl/lotus/${e://Field/project}/event/end_test_qn/${e://Field/ResponseID}
- You've done it! But before we celebrate, as always, we should double check whether everything is working correctly and whether we made any mistakes/typos:
- Navigate to the 'View Participants > Edit' menu
- Set your participant's status to 'SessionOpened' and session to 'Screening' and login.
- Fill out your questionnaire, and make sure to check which answers you choose and remember what your score should be.
- If everything went fine, you should be redirected to Lotus afterwards and arrive at the usual status page.
- Finally, go back to your participant info and check whether his parameter 'scoreTEST' has been updated and is correct!
Recap
Alright! Again, your project is much closer to being finished! Before this module, you project consisted only of some default sessions and tasks. But by now, you're able to do much more! What have you learned from this tutorial?
- You've learned how to create a new questionnaire, and change all the settings that are involved!
- You've mastered Lotus even further, going into depth on actions and events!
- You've added a new dimension to you project, allowing for much more diverse types of research and projects!
Nonetheless, this tutorial was only an introduction into connecting Lotus with Qualtrics. The systems are very flexible, and can be used in many different ways. Try to be creative and think of new ways to use your questionnaires and it's data!
Good luck on developing your project!
Advanced module II : Pages
In the basic tutorial we covered several elements of the Pages menu. You already learned the general principle of adding new pages for specific sessions such as the screening.
This tutorial is aimed at explaining when to use which pages and to give a number of tips and tricks to make your life easier.
How to use status pages efficiently: session parameters
In one of the previous examples we created a status page with the condition ${session.name} == ‘screening’. This is a good way of showing very specific pages for very specific sessions, however it is a lot of effort to do this for all session separately. Luckily there are a lot more identifiers than just a session name for you to use. Let’s explore.
We already know that:
- every participant has a user status
- placeholder: ${user.status}
- example output: project_completed
- every participant has user parameters
- placeholder: ${user.}
- example usage: ${user.birthdate}
- every session has session parameters
- placeholder: ${session.}
- example usage: ${session.rank}
All these variables allow us to specify which users should see which pages when.
If you navigate to Define Project -> Pages -> Status you will already see a few examples of different user statuses (e.g. ${user.status} == PROJECT_COMPLETED) and user parameters (e.g. ${user.emailChecked} == 'false'). These are added to your project by default. In general you should leave the user status pages as they are, because they already cover every status a user can have.
You might have noticed that there are no session parameters yet. This is because the default project is very general and does not have a lot of customization. Because of how useful session parameters are and as there are no examples given, they will be the focus of the remainder of this advanced tutorial.
Before you get underway it is important to pause for a moment and ask yourself what you want participants to see when they are enrolled in your project. Should there be specific information given for certain situations, or are broad informational messages sufficient? For example do you really want participants to receive the same instructions when starting two completely different tasks? Because this is the way lotus handles this situation by default. Let’s see for ourselves:
If you look at sequence number 30 in the Status pages you will notice the condition ‘${user.status} == SESSION_OPENED || ${user.status} == TASK_STARTED’. This means that whenever someone is allowed to start the session they are in (their session has been opened) or they have previously started the task but did not finish they will see the message:
You can start the session ${session.name}. Please click <a href="${link.event(Start Task)}">here</a>
For participants this would look like:
You can start the session screening. Please click here
It is very likely that this is not informative enough for all tasks you require participants to do. You probably need to give more detailed instructions before they start a computerized task than when they perform a simple questionnaire.
Another example: it makes sense to show an informative welcome page when people first login and a different page between the various tasks of that session. This is where session parameters come into play. Let’s use a session parameter to create a welcome page that is only shown once every session.
Navigate to the session parameter menu (Define Project -> Sessions -> Session Parameters).
You see ‘type’ and ‘publicName’. These parameters can be completely changed to suit your needs as they do not currently serve a function. Let’s create one of our own which ensures that people are welcomed during the first task they perform that day.
- Click on ‘Add a new parameter’
- Name it ‘firstTask’
- Under ‘Type’ select ‘enum’
- Click on ‘Edit values’ next to ‘enum’
- Click twice on ‘Add a new value’
- Under ‘Value’ write ‘false’ and below that ‘true’ (without the single quotes)
- Click on ‘Ok’
- Under ‘Show in overview’ give it number ‘2’
- Click on ‘Submit’

If you performed this correctly under ‘Default Value’ it should say ‘false’. If it says ‘true’, it is because you placed ‘true’ above ‘false’ during the third to last step: “Under ‘Value’ write ‘false’ and below that ‘true’ (without the single quotes)”. Select ‘false’ instead and press ‘Submit’.
What have we done so far? We created a session parameter named ‘firstTask’, which is by default set to false and is displayed in the Session Overview. Now we need to define for which sessions this parameter needs to be set to true. Browse to the Session Overview (Define Project -> Sessions -> Overview) and note there is now a column that is named ‘firstTask’.
- Set ‘firstTask’ to ‘true’ for the session named ‘training 1’
- Click on ‘Submit’

Alright, it’s time to go back to where we started: the status pages (Define Project -> Pages -> Status). We will now create a status page which will be displayed for all sessions that have the value ‘true’ for ‘firstTask’. In our case that is the session named ‘training 1’.
- Click on ‘Add a new conditional message’
- Give it sequence number ‘29’
- Under ‘Condition’ add the following: ${session.firstTask} == ‘true’
- Type some text in the ‘Message’ box, for example:
<p>This is the first session of the day.<br>
This session consists of several computerized tasks and questionnaires.<br>
Please don’t close the browser until you’re told to do so<br><br>
Click <a href="${link.event(Start Task)}">here</a> to start with the first task.</p>

All steps are now completed! We have created a session parameter, we have defined which value it should have for different sessions and finally we created a page which will be shown if the condition is true. Let’s see how lotus puts this into practice.
- Go to the participant account you created earlier (View Participants -> Edit).
- Make sure that its ‘Session’ is set to ‘Screening 1’ and its status is ‘SessionOpened’. If it isn’t, set it to these values and press ‘Submit’.
` - Log into the account by pressing ‘Login’ at the top right of the menu.
A new tab opens and it should say:
You can start the session screening. Please click here
Lotus displays this page because ‘firstTask’ was not set to ‘true’ for Screening 1. Let’s see what happens when we change our session to ‘training 1’.
- Navigate back to the tab where you can edit the participant status.
- This time set ‘Session’ to ‘training 1’
- Click on ‘Submit’
- Make sure that ‘Status’ is set to ‘SessionOpened’
- Click on ‘Login’
This time the screen should show the following:
This is the first session of the day.
This session consists of several computerized tasks and questionnaires.
Please don’t close the browser until you’re told to do so.

Click here to start with the first task.
Voilà, we created a way to display a page only for the first task of a session.
Every time you create a session that contains the first task of the day, you just have to set the session parameter firstTask to true for this session, so that the message above is displayed for each participant starting this session.
In a completely similar manner you can accomplish this also for the distinction between for example computerized tasks and questionnaires. Simply (1) create a session parameter named ‘taskType’, (2) give it the values ‘computerTask’ and ‘questionnaire’, (3) assign these values to the correct sessions and (4) create two status pages for ${session.taskType} == ‘computerTask’ and ${session.taskType} == ‘questionnaire’.
You can use session parameters to accomplish a variety of scenarios not mentioned here. Be creative!
When to use custom pages?
There are three scenarios in which it makes sense to create a custom page, rather than to use a new status page.
- The page must be permanently accessible from all sessions.
- The page contains a form which participants need to fill out.
- You want to show a goodbye/thank you message at the end of the tasks of a session.
Let’s look at the three scenarios separately.
1) First, there is the scenario where you want participants to be able to go to a specific page whenever they desire. This could be necessary for a number of pages, such as a help page, a page to reset a password or a page where users can indicate that they no longer want to participate in your project. You can link to these custom pages in status pages, emails or more permanently in the layout template used by lotus (it would be displayed in the same way the logout link is, but you have to ask your lotus administrator to make such changes). To create a link to a custom page use:
<a href=”${link.page(Name of Custom Page)}”>What You Want Users To See</a>
Example:
<a href=”${link.page(Help page for participants)}”>Click here to go to our help page</a>

2) The second scenario where a custom page is preferable over a status page is when you need additional information from the participant. Often the registration page alone is not enough. You might need participants to agree to an informed consent or be able to change information entered in an earlier stage. You can do this by creating a custom page with input variables (see hier for more information about these variables). At the bottom of the form you must place a submit button otherwise Lotus won’t receive the data people enter into the input fields. Example of a page to change your password:
<p>${input.password('required>'true', 'label>'New password')}
${input.Confirm.password('required'=>'true', 'label'=>'Confirm your new password')}</p>
<div class="input submit"><button type="submit">Save new password</button></div>
To tell Lotus what it needs to do with the data a user just sent, add a User Event under ‘Event fired when form is submitted’. This User Event should have the Action ‘Save User Parameters’.
3) Finally, the last scenario where custom pages are your best bet, which is when people arrive at the end of a session. Session in this context means all tasks, questionnaires, etc. that you require participants to perform for that specific moment. Not the way lotus defines a session (as one single task). To avoid confusion I will refer to the task-based lotus-sessions as ‘tasks’ in the next few paragraphs.
Within a session it makes sense to use status pages as each task and user status (SessionOpened, TaskStarted) can be uniquely identified. However, there is ambiguity when people finish the last task and arrive at the end of a session. To understand where this ambiguity comes from a little background information is needed:
To create a session of various tasks in lotus, the tasks must be grouped together somehow. This grouping can be done in the Session Overview (Define Project -> Sessions -> Overview) by setting all Session Open offsets to 0 for tasks that belong to one session. As a result all of these tasks will be sequentially available to a participant immediately after they start the session. The end of a session can be defined by giving a value to the Session Open offset of the first task of the next session. When participants finish all tasks that have no offset delay, they will be halted when they reach the task that does have an offset value. Their user status will be set to state_initialized.
Now if we wanted to show participants that they are finished at this point, we could create a page such as:
The final part of this session has been finished. Good job!

This session is now completely finished and you can close the program.
Starting tomorrow you can perform another training.
We recommend to train at least every other day.
We could attempt to do this by using a status page with the condition:
${session.name} == ‘Name of the first task of the next session’ && ${user.status} == STATE_INITIALIZED and place it above the already programmed ${user.status} == STATE_INITIALIZED at sequence 25 which says:
You must wait until ${timestamp.SessionOpen(format=>%d %B %Y %H:%M)} before you can start the next session.
But there is a problem. What happens when someone logs into lotus before they are allowed to start the next session? They are supposed to see the message that says they have to wait, but instead they again see the message intended for the end of the previous session. The condition ${session.name} == ‘training 2’ && ${user.status} == STATE_INITIALIZED remains valid until the next session opens.
To solve this problem you should place the end of a session message in a custom page. This way people only get to see it when they are redirected here and when they do log in early they see the message that they must wait. It is possible to redirect people to the same page after every session ending, to do so add it in the redirect of a User Event.